DIY Tribal Painted Backpack

As an artist, I find myself spending time looking at trends in and out of my wheelhouse – trends in home decor, clothing, kitchens, art, and design. I read magazines, check blogs, visit websites, and even brave watching some design shows to stay up on what is happening. Sometimes I see color combinations that inspire a project. Other times, I see a decadent item that I try to recreate in a more economical way. Still other times I find patterns or designs that I want to incorporate into my work.
Lately I have been completely obsessed with tribal patterns in everything – clothes, blankets, and décor. The patterns vary and can come in variety of styles, but one thing is always certain – tons of bright and fun colors mixed with geometric shapes. The vibrancy and life that they provide can enhance just about anything.
That said, last weekend, I saw a purse and I fell in love. It was bright and full of texture and design elements that spoke to me – that was, until I saw the price. Darn it!
Isn’t that what always happens? We see something and fall in love, only for it to be budget-prohibitive. I think that this is when I find inspiration, however, and when I am motivated to do something different and innovative with my craft supplies at home.
Enter the DIY idea generator! I will make my own – and I will show you how to do it, too!
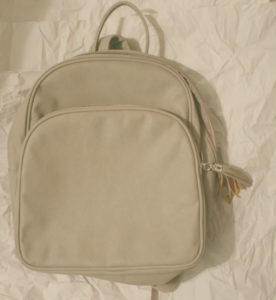
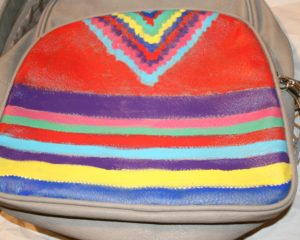
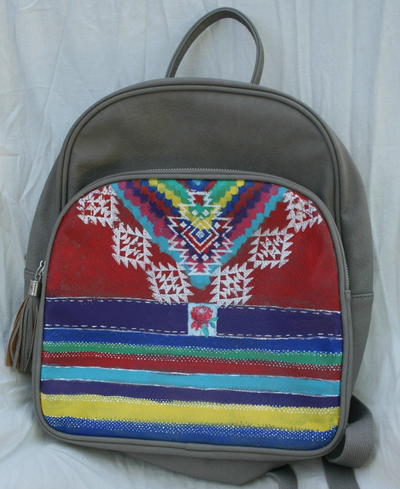
This backpack is faux leather, but the paints and supplies I use will work on fabric as well as real leather, so it is perfect as a purse or for back to school!

Materials List
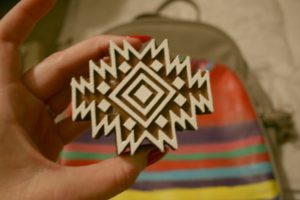
- Fabric Creations™ Block Printing Stamps – Medium – Aztec Tile
- Fabric Creations™ Block Printing Stamps – Small – Aztec Tile
- Fabric Creations™ Soft Fabric Inks
- Fabric Creations™ Tools – Foam Printing Mat, 2 pc.
- paint brushes – variety of sizes
- washi tape or painters tape
- backpackpaper or cloth – to protect work surface
Instructions
-
Set up your work space by protecting your work area with paper or a piece of cloth.
-
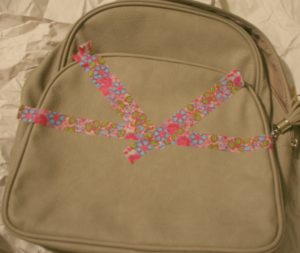
Using your washi tape, set up your work grids
-
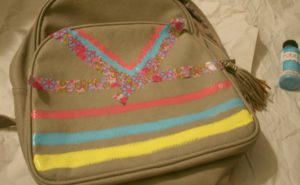
Start adding paint at the top in little dabs. Allow it to dry completely before adding the next coat. You can also start adding stripes below.
-
Allow all of the layers to dry and then remove the tape.
-
Place the foam blocks inside the pocket for extra support
-
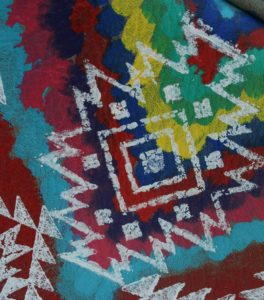
Add paint to your printing block. Carefully stamp the image onto the backpack, applying even pressure.
-
Add complimentary stamps onto the backpack
-
Then, using a fine tip brush, add in dots, dashes, and doodles to help enhance your design. It is an organic project, so it is ok if there is variation!
-
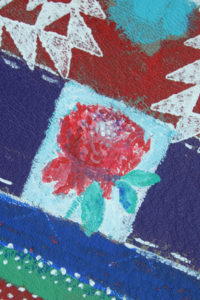
You can get extra creative and hand paint an image – I did a rose… not necessary, but I wanted to add a little bit of floral flair to make it a bit more me!
-
Now all that is left to do is grab your bag, fill it up, and put it to use!


Your Recently Viewed Projects
Thanks for your comment. Don't forget to share!
flowergirl
Aug 05, 2018
I honestly love upcyling bags and purses. If I see a new trendy design that I cannot afford, I try to DIY my way around the price tag. I love this Aztec tribal print, I've done it to my white cans and they turned out perfect so this tutorial should work out fine too. It looks especially good if you have a canvas bag but it works perfectly on faux leather too.
Report Inappropriate Comment
Are you sure you would like to report this comment? It will be flagged for our moderators to take action.
Thank you for taking the time to improve the content on our site.