This project was submitted by one of our readers, just like you.
Craft Your Own Adorable Felt Mouse: A Fun And Easy Diy Project

Craft Your Own Adorable Felt Mouse A Fun And Easy Diy Project
"Are you looking for a delightful and creative project that’s perfect for both kids and adults? Look no further! Our Felt Mouse Craft is a fun and easy DIY activity that will bring a touch of charm to any playtime or decor. This felt mouse is the perfect solution whether you want to create a cute toy for imaginative play or unique decoration. In this post, we’ll guide you through each step to help you craft your very own adorable felt mouse. Get your materials ready and let’s dive into this fun-filled project!"
Primary TechniqueFabric Crafts

Materials List
- Felt fabric
- A pencil or marker
- A pair of scissors
- A needle
- Matching thread
- Cotton
Instructions
-
Select your desired color of felt fabric for the base patterns, outer ears, and the upper legs of the mouse. Use a fabric marker to trace the provided patterns on the selected felt fabrics and cut them out nicely using scissors.
-
Use a marker to draw the eyes, nose and whiskers of the mouse.
-
Work satin stitches to fill the marked eyes, nose and whiskers.
-
Place the inner ear cutouts on the outer ear cutouts.
-
Use thread matching with the inner ear parts to stitch them with the outer ears. Work appliqué stitches.
-
Place the base cutout on a flat surface and then place the ear patterns on the top side of it. Slightly overlap the narrow ends of the ears with the top side of the base.
-
Place the front body pattern on top of the base pattern, keeping the ear patterns between the 2 base layers.
-
Work flat blanket stitches around the sides. Work appliqué stitches when crossing the ear parts.
-
Once the stitching reaches a side (either left or right), place the upper leg on that side (inwards) and place the tail’s inner edge between the base layers.
-
Stitch along to join the upper leg and tail with the base patterns. Place the bottom legs along the bottom side of the base layers and stitch them with the bases.
-
Stuff the felt mouse with cotton through the other side, before stitching the 2nd upper leg.
-
Once you are done stuffing, stitch the opening to secure the stuffing. Tie a knot or 2 and cut off the extra thread.

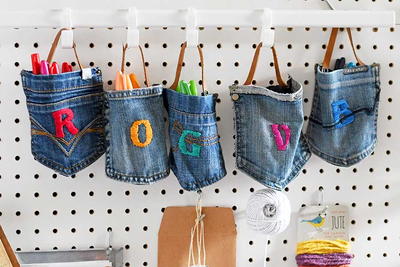
Read NextUpcycled Jean Pocket Hanging Storage